Vinyl Transfers are SO easy to put up, but add an amazing amount of elegance to the wall. Not only that – but they also help to fill areas that are otherwise hard to find the ‘perfect’ decoration for.
After reviewing Vinyl Transfers for The Simple Stencil; I decided to make a tutorial for you all.
How to Install Vinyl Wall Decals:
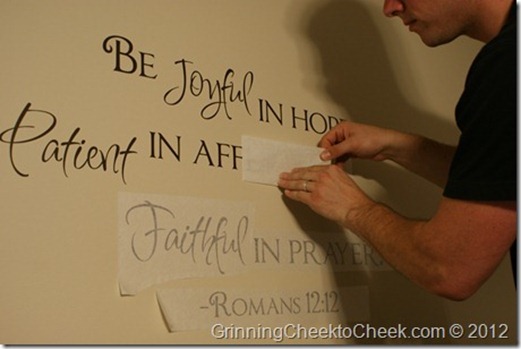
After laying the words out, we figured the height, and found our center point – which we decided was the ‘u’ in Joyful. That was the word we were putting up first for our reference of where to put all the other words.
Peeling the paper:
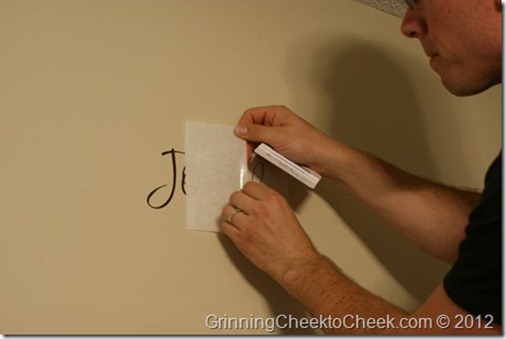
You will first need to peel the backing/paper off from the contact paper with the vinyl.
The best way to do this without having letters stick is to keep the sheet that you want the letters to stick to – perfectly straight. Then pull back the part that you do not want the letters to stick.
The letters like to stick to the straighter piece.
Sticking to the wall:
Then you want to stick them to the wall – being careful to only secure the edges of the sticky portion and not the entire vinyl area – JUST in case if you want to adjust or re-arrange some things.
Rearranging:
We realized at this point that the ‘in affliction’ would have to be closer to the ‘t’ in patient, in order to match the top line. So we had to rearrange. This was not a big deal, because we didn’t tack it down fully.
It’s good also to step-back and be sure that everything is level from a distance. You wouldn’t want to think it’s straight, but then from across the room realize that it’s crooked!!
Transferring:
It helps a lot to have a cool transfer tool like the one that comes from The Simple Stencil.
But if you don’t have one of these – be sure to use something like a rubber spatula or other rubbery flat item so you can be sure it fully gets transferred to the wall. Rub all over the entire vinyl area.
If your walls are textured, you’re going to have to work twice as hard to be sure that every area of the vinyl transfer sticks between the bumps. Not Ideal – but not impossible.
Peeling:
Again. Remember that the Vinyl likes to stick to the more flat surface. So when you’re peeling – be sure to bend straight back with the contact paper, so that a) it sticks to the wall, and b) you can see right away if something doesn’t stick. Go slowly.
Then you can correct it right away if necessary.
Correction:
If an area doesn’t seem to be sticking. Just simply cover it again with the contact paper, rub a little more on the surface, and then pull back again.
Notice how my husband keeps the tool in his hand for just that purpose. You don’t want to half-pull the contact paper off and then have to go get something to fix the letters. It could screw up a larger area.
The Simple Stencil’s Vinyl was very easy to work with though – so after a few words, he just knew he could trust that it was going to come right off of the contact paper.
Enjoy!
It’s also pretty to put some other decorations around the transfers – to add some dimension. We’re still in search of the perfect wall sconces for either side of this verse – but meanwhile, this is still beautiful!
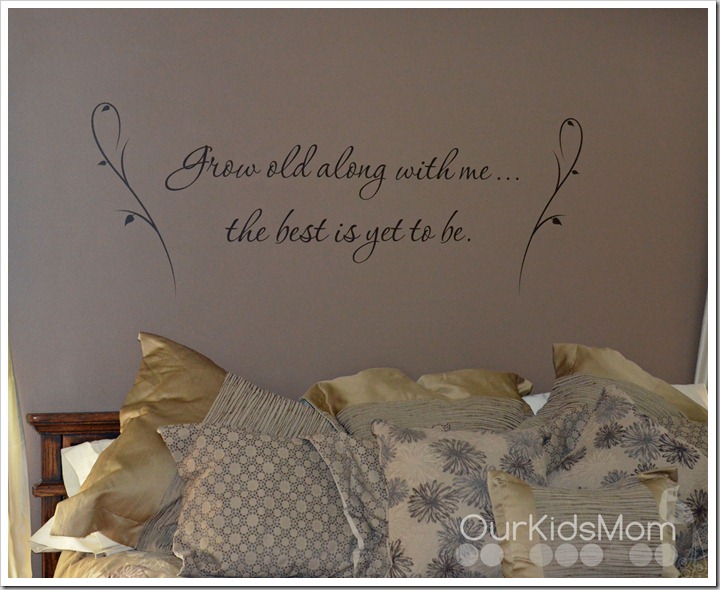
Heather from OurKidsMom.com decided to get some mirrored images to go on either side of her transfers:
The possibilities are really endless!
![DSC03795_thumb[1] DSC03795_thumb[1]](https://www.grinningcheektocheek.com/wp-content/uploads/2012/05/DSC03795_thumb1_thumb.jpg)
![DSC03796_thumb[5] DSC03796_thumb[5]](https://www.grinningcheektocheek.com/wp-content/uploads/2012/05/DSC03796_thumb5_thumb.jpg)
![DSC03798_thumb[4] DSC03798_thumb[4]](https://www.grinningcheektocheek.com/wp-content/uploads/2012/05/DSC03798_thumb4_thumb.jpg)
![DSC03793_thumb[6] DSC03793_thumb[6]](https://www.grinningcheektocheek.com/wp-content/uploads/2012/05/DSC03793_thumb6_thumb.jpg)


![DSC03803_thumb[4] DSC03803_thumb[4]](https://www.grinningcheektocheek.com/wp-content/uploads/2012/05/DSC03803_thumb4_thumb.jpg)


Definitely “Through the Trees” is my favorite! It works perfectly with the color scheme I’ve just picked out for our new nursery!kids wall decals
That was very helpful, Thanks! Yours look gorgeous and so put together : )
Gladys P
sps1113 at yahoo dot com
So pretty! I have always been too afraid to stick those on my wall…maybe I need to get over my fear and just do it!
My daughter in law loves these and has some beautiful ones in the kids rooms.
Thank you for showing how to install vinyl transfer wall decals! I really like the vinyl wall decals that I installed over this bed. What a great saying out of the bible in Romans!
I am much like you in that I too cannot afford to spend that kind of money on “decor”. We just had our new home quoted for wall-to-wall carpet. Not expensive carpet either. The quote came up to just over $5000 I almost hit the floor!
We’re moving in at the end of this month, probably leaving the same stale carpet down that is there now. It makes me crazy because later when we do replace it, it’s going to cost more because of the added expense of moving furniture! UGH! I just cannot win.
Getting to why I am really posting here, I appreciate the tutorial on the application of wall appliques. We will be doing alot of those in the house soon. Especially in the baby’s room.
Our daughter who is aged 17 is expecting a boy in November. We’re going to be first-time grandparents. Yay!
I really love this idea, thank you for sharing!
this is so neat, I’ve never done anything like this, would be great for kids romms
I’ve actually done this before, and I was surprised at how easy it was. Yours look great!
Looks great! I’m looking forward to trying these, especially in my girl’s rooms, since they like to change things a lot.
My sister and I sell Uppercase Living vinyl and this is a great tutorial!
Oh my gosh! I love this! I have never thought of using vinyl transfers. It looks so elegant on your wall!!!
Maureen
maureen.tenney@gmail.com
I love these. My daughter just put up the vinyl decals in the living room and it turned out so nice!
This was a helpful post. I have used wall decals before but they didn’t go on that easy!
I was wondering if you ever considered changing the structure of your website?
Its very well written; I love what youve got to say.
But maybe you could a little more in the way of content so people could connect with it better.
Youve got an awful lot of text for only having 1 or two images.
Maybe you could space it out better?
My family members all the time say that I am wasting my time here at web, but I know I am getting familiarity every day by reading thes nice posts.